Now that we’ve learnt about social engineering, let’s put our new knowledge to work. In this tutorial, we’ll create a phishing page that’ll be served from a rogue Wi-Fi access point. If a victim then enters their details in this page, they will be delivered directly to you.
We’re going to be using WiFi-Pumpkin and Kali (You can also use ParrotSec or even plain Ubuntu).
We’ll also need an external Wi-Fi adapter. Why is that? Say you’re trying to set up this phishing page in a McDonald’s or a Starbucks. Your laptop’s internal network controller will be connected to McDonald’s Wi-Fi and your external Wi-Fi adapter will be turned into a rogue access point.
The external adapter will be our man in the middle and will actually serve the phishing page into which our victim’s can then enter their details. (I strongly recommend the WN722N. It’s small and powerful, practically tailor-made for hacking and it supports every kind of WiFi attack that we’ll learn about in the next tutorials. And it’s quite cheap!)
How to install WiFi-Pumpkin
The installation is pretty straight forward.
1. Go to where you want to install it
I’m going to my desktop:
cd desktop
2. Get the source code
git clone https://github.com/P0cL4bs/WiFi-Pumpkin.git
3. Go to the source code
cd WiFi-Pumpkin
4. Install
./installer.sh –install
It’ll take a good 10-15 minutes while it installs all the dependencies but soon enough you should end up here:

P.S: If you run into any errors, check out the official repository for further instructions.
Create the phishing login page
First, we need to actually build our phishing page. In a real-world scenario, you’ll probably want to do this with the login page of the website which you’re trying to get your victim’s password for. For example, if you’re trying to hack their Facebook or Twitter or Gmail, you’ll have to clone their login pages and use those.
Today’s browsers are pretty smart, so I can’t give you these login pages directly (otherwise this website will be blacklisted as malicious and the browser will prevent you from opening it and you wouldn’t be here reading this). However, I’ve built an example login page for you to try out which you can download here (or clone it out of my github repo using git clone https://github.com/XeusHack/Fake-Login-Page.git).
You’ll need to unzip these files under /var/www/html directory as this is where web server files are usually stored.
Setting up MySQL
Now that our fake webpage files are where they need to be, we need to actually spin up a database. MySQL is what we’re going to use. (It comes pre-installed in Linux)
So let’s set up MySQL. Open up a terminal and:
mysql -u root
This will take you into the MySQL console. Now we need to create a database for our phishing website. You can name it anything you want:
create database xeus
Next, we’re going to go inside of our newly created database:
use xeus
We now need to create a table where our victim’s information will end up.
create table logins(network varchar(64), email varchar(64), password varchar (64));
And we’re done (with the MySQL bit). Now we need to actually hook up our phishing page to this database.
Head over to var/www/html (which is where we unzipped the fake login page) and open up the file called database.php. You need to fill out the details in the square brackets.
$username="[USERNAME]";
$password="[PASSWORD";
$db_name="[DATABASE_NAME]";
$tbl_name="[TABLE NAME]";
Here’s what my file looks like:
$username="root";
$password="toor";
$db_name="xeus";
$tbl_name="logins";
Now we need to restart MySQL so that it realizes what we just did above:
sudo /etc/init.d/mysql restart
Setting up WiFi-Pumpkin
Wi-Fi Pumpkin is an entire framework for rogue Wi-Fi access point attacks. It comes with numerous plugins and modules and can do a whole lot more than phishing, but we’re interested in these three specific modules: Rogue AP, Phishing Manager and DNS Spoof. Using these modules we’ll connect our phishing page to the rogue access point so we can serve it to unsuspecting victim’s. So let’s start.
- Open up WiFi-Pumpkin by typing
python wifi-pumpkin.py(make sure you’re in the same directory you installed WiFi-Pumpkin in). This is what it looks like:

Now we need to configure some options. Go to the Settings tab.
- Set
Gatewayto your router’s IP address (it’s usually192.168.1.1) - Set your
SSIDto something believable like “Definitely McDonalds WiFi and not a Rogue AP” - If your rogue access point is expected to be secured (your victim is expecting to have to type in a password), you should toggle
Enable WiFi Securityand enter the same expected password so that it’s more believable. If the victim does not expect to have to type in a password (like in public access points), then you don’t need to enable any security. - Don’t forget to set your network adapter (this would be your external W-iFi adapter). It should come up as
wlan0orwlan1. - Under the
Pluginstab, uncheck “Enable Proxy Server”. - Now open up
Modules(in the menu) and selectPhishing Manager. The IP address could be anything we like, say10.0.0.1(the port should be 80). WiFi-Pumpkin allows you to connect your phishing page in a number of ways. We’ve already got our fake login page setup, so simply enableSet Directoryunder Options and set theSetEnv PATHto where you unzipped the files:/var/www/html. Finally, hitStart Server. - Now under
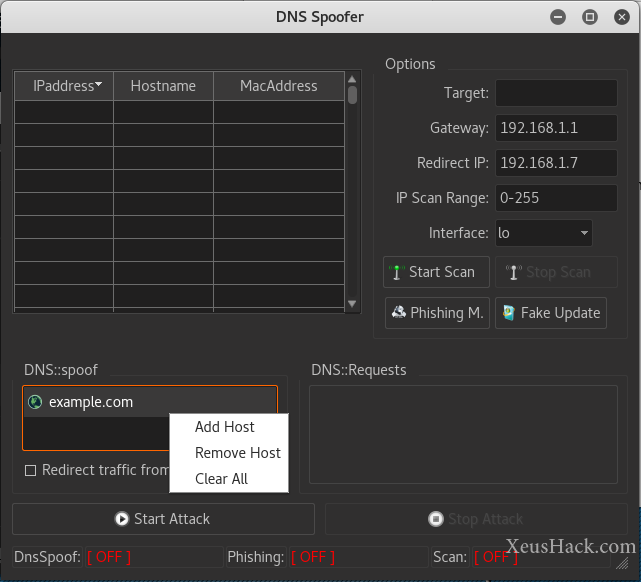
Modules->DNS SpooferenableRedirect traffic from all domains. ClickStart Attack.
- Under the
Viewmenu item, selectMonitor NetCreds. ClickCapture Logs.
And we’re done! Now when our victim connects to our rogue access point, they’ll be redirected to our phishing page. Any credentials that are entered on the phishing page will show up on our system in plain text.
This was an extremely basic example. There are definitely better ways to do this:
- Our login page that we used above doesn’t look very convincing. Use a real website (like Facebook or Gmail) by downloading their login pages with HTTrack or just
wget. - Redirect only the specific page to our phishing page. For example: If the victim types in facebook.com in their browser, it should head over to our facebook phishing page. And perhaps another one for Gmail, maybe one for Twitter too. Sky’s the limit.
- Directly use the API of your targeted service (like Facebook) and when the victim types in their credentials into our website, redirect them to create a legitimate Facebook session so that the victim never realizes that they’ve been hacked.
Just a few ideas to keep you busy :)
But for now we must keep moving. Next up in our journey we’re going to learn how to hack Wi-Fi.
Want to be a real hacker? Sign Up!